Get Festive with Custom Nail Solutions’ Katie Saxton’s #Holiday #Manicure Tips #guest blog! !
Custom Nail Solutions President Katie Saxton has been on this blog before and she has tips on holiday nail trends for you to check out!
The Holiday 2013 season is quickly approaching, which means you’re probably gearing up for all of the festive gift-exchange parties and fun nights of caroling. Along with your favorite Christmas sweater and Santa hat, make sure to add an extra dash of holiday cheer to your seasonal attire with a fab and festive manicure! Katie Saxton, Nail Expert and President of Custom Nail Solutions, has the exclusive inside on merry manicures that will help you turn heads at all of the season’s holiday parades and Secret Santa parties!
According to Katie, the top nail trends of the 2013 Holiday season are:
Gleeful Glitter:
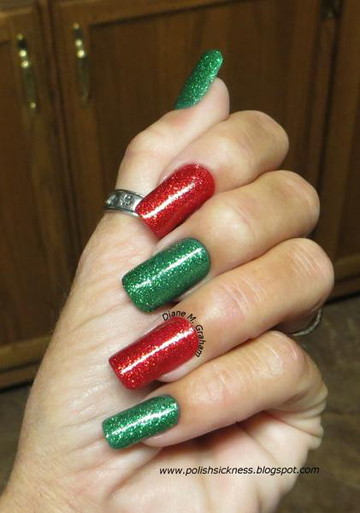
Everything seems to sparkle during the holidays, and this should also hold true for your nails! Paint your nails red and green, alternating the colors on each nail, and let dry. Then, paint each red nail with a coat of red glitter polish and add a coat of green glitter polish to all of the green nails. Let dry and voilà! Your nails are ready to steal the spotlight at all your merry festivities!
Winter Snowflake Mani:
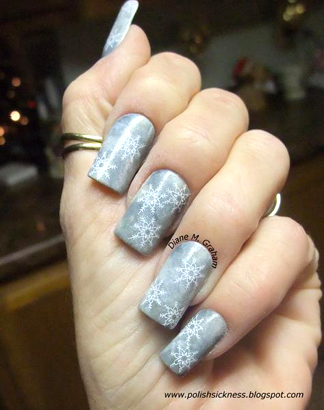
Snowflake nail stamps are a fab and festive way to add pizazz to your holiday mani! Before you do this design, make sure you have blue polish, silver polish, clear topcoat, and a nail stamp kit with a snowflake stamping plate on hand. We like the Nail Art Stamping Set by Shany Cosmetics. Paint your nails blue and let dry, then place silver polish over the snowflake design on the stamping plate, and use the nail kit’s scraper to rid the plate of excess polish. While the silver polish is still wet, place the stamper over the plate so the snowflake design transfers, then press the stamper down on the nail. Do this until each nail is adorned with cute little silver snowflakes. Finish the look by adding a clear topcoat to each nail.
Christmas Tree Tape Mani:
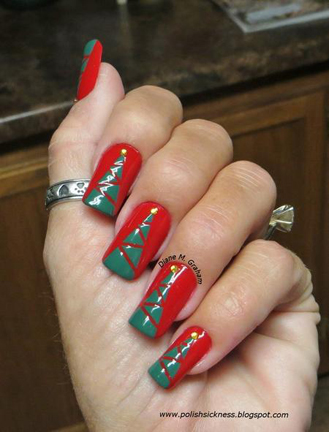
We all love gazing at dazzling Christmas trees during the holiday season. Celebrate this lovely holiday tradition with a merry Christmas tree tape mani! To do this nail design, have on-hand green polish, red polish, Scotch tape, scissors, nail glue, and gold nail gems. Paint the first nail red and let dry, then lay a piece of tape from the bottom left edge to the center of the tip, and place a second piece of tape from the right bottom edge to the center of the tip, making sure the pieces of tape intersect at a point below the upper edge of the nail. This will form a triangle “tree” of space in the middle of the nail. Cut several strips of tape and place them horizontally across the “tree,” making sure they are not exactly parallel. Paint over the nail and tape strips with green polish and remove the tape strips while the polish is still dry. Let dry and repeat for each nail. Once all the nails are adorned with little green Christmas trees against a red background, add a clear topcoat to each nail. Once dry, use nail glue to glue gold nail gem “stars” at the top of each tree!
Pretty Presents:
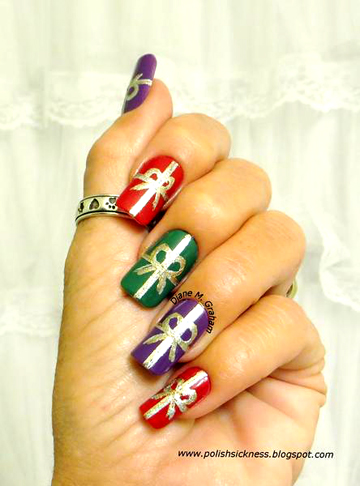
Make sure your nails are like cheerful little holiday gifts this season! To do this mani, have on-hand red polish, green polish, purple polish, gold polish, and silver polish. Paint each nail either red, green, or purple, alternating the colors for each nail. Then, using a toothpick, paint a single gold “ribbon” from the top of each nail to the bottom, and add a silver line next to the gold. Let dry, then use the toothpick to draw horizontal gold and silver ribbons through the middle of each nail. Once dry, use a toothpick to add little silver and gold “bows” where the ribbons intersect. Add a clear topcoat to complete the look.
Cheerful Champagne Mani:

Nothing says “Happy Holidays!” like a glass of bubbly with all of your closest friends and relatives! For this festive holiday manicure, paint your nails with a coat of shimmery gold polish and let dry, then add gold glitter polish to the tips. This fun holiday mani is sure to get you noticed this season!
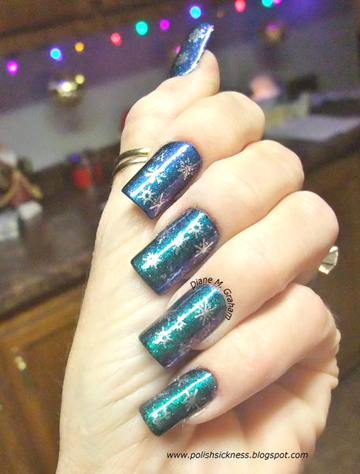
Jubilant New Year Mani:

This flashy nail design will help you look fabulous as you count down to the New Year! Paint all of your nails royal blue and let dry, then add a coat of multi-colored glitter polish on each nail. This is a fun and festive way to celebrate the New Year!
Christmas Lights Mani:
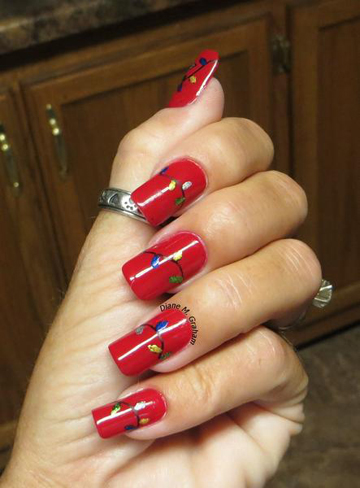
Show off your artistic side with this lovely manicure! Paint your nails red and let dry, then, using a toothpick and black nail polish, draw a squiggly black “light cord” from the outer edge of your thumbnail to the outer edge of your pinky nail, making certain to only get polish on the nails. Let the polish dry, then paint little holiday Christmas lights both above and below the cord, using polishes of all different colors. Once complete and dry, add a final topcoat to complete the look!
Joyous Water Marble Mani:
An eye-catching red and green water marble mani will look great with all of your holiday get-ups! To do this intricate and eye-catching design, start off with a cup of room temperature water, a bottle of red polish, and a bottle of green polish, as well as tape and several toothpicks. Place tape around the edge of the first nail, covering the cuticles. Add two drops of red to the water and let spread, then a drop of green polish in the middle of the red polish. Then, take a toothpick and drag the edges of the polish to the center of the circle. Press your nail into the design, use a toothpick to scrape excess polish away from the edges of the nail, and take the nail out of the water. Then remove the tape and let dry. Use a toothpick to clear the polish from the top of the water, and repeat the process with the rest of the nails. Add a final clear topcoat to complete the look. The end result: a jolly water marble mani that is sure to be the talk of every seasonal soiree you attend!
If you are trying to figure out how to add holiday pizazz to your nails for the Holiday 2013 season, the above list should help. Katie’s tips on festive and merry nail art are available for your coverage with the below credit and direct link back to www.customnailsolutions.com.
Thanks to Katie Saxton for this great display of creative nail artistry!
Katie Saxton is the President of Custom Nail Solutions, a renowned blogger, and regular contributor to TV, radio, print and online media, on topics of nail beauty, nail care and trends The Custom Nail Solutions Nail System provides a perfect canvas for the below Summer 2013 nail designs. It is a revolutionary artificial nail product that gives you reusable and chemical-free custom nails that uniquely fit only your nail beds. They are thinnber, stronger, and virtually indestructible. You can have lovely, natural-looking salon-style nails on your own schedule and in the comfort of your own home.
http://www.customnailsolutions.com/
Stevie Wilson,
LA-Story.com


Get free shipping everyday on orders $35+ at Beauty.com plus earn 5% back!


Subscribe to RSS headline updates from:
Powered by FeedBurner
If you are going to feature content from LA-Story.com including podcasts or videos including the accompanying text, please respect copyright provisions. We require a notation of content origination (meaning credit tag), a linkback to the specific page & please email the link to stevie@la-story.com before the piece goes live.
LA-Story.com, LA-Story Recessionista, Celebrity Stylescope, Celebrity Style Slam Trademark/Copyright: KBP Inc./TNBT Inc 2007-13