Tired of spending money on hair gels that make your curls crunchy?
Most store-bought hair gels contain harsh chemicals such as sulfates and alcohols that dry out hair and irritate the skin. They cost anywhere from $10 to $20 per bottle and often leave curls crunchy and stiff.
People with curly or wavy hair struggle to find products that work without leaving residue.
After researching natural alternatives and testing five different flaxseed-to-water ratios over three months, I found that flaxseed gel addresses these problems.
It costs under $1 per batch, contains zero synthetic chemicals, and you can customize it for any hair type. This evidence-based guide shows you exactly how to make it safely and effectively.
Medical Disclaimer: This article is for informational purposes only and does not constitute medical or professional advice. Individual results may vary. Always perform a patch test before applying any new product to your hair or skin. If you experience irritation, discontinue use and consult a healthcare professional.
What Is Flaxseed Gel and Why Does It Work?
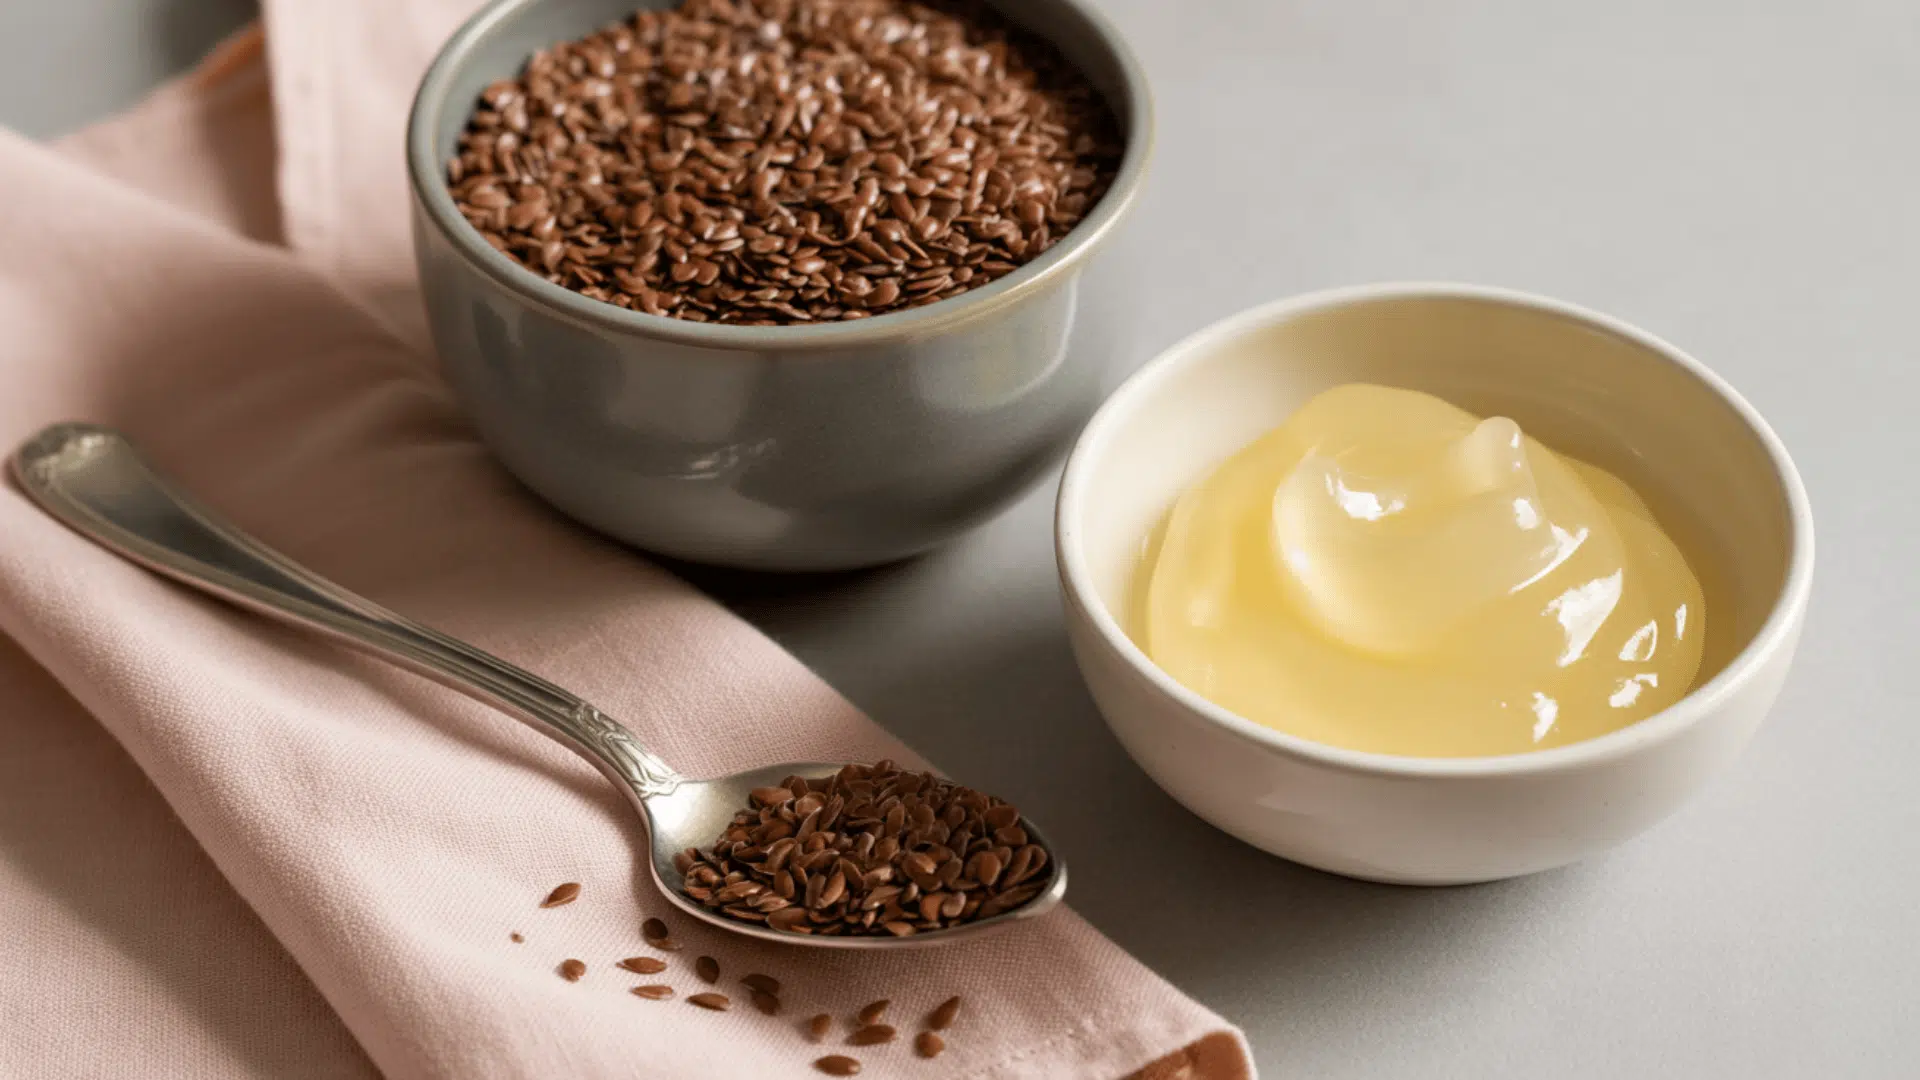
Flaxseed gel is a natural styling product made by boiling flaxseeds in water. When heated, the seeds release a clear, gel-like substance from their outer coating called mucilage, which forms the base of this natural hair treatment.
According to the USDA FoodData Central database, flaxseeds contain approximately 2.3 grams of omega-3 fatty acids per tablespoon. These fatty acids, particularly alpha-linolenic acid (ALA), may support hair health by reducing inflammation at the follicle level.
Flaxseeds also contain lignans, plant compounds with antioxidant properties. Research from the Linus Pauling Institute at Oregon State University indicates that lignans may help protect cells from oxidative stress.
While most studies focus on dietary consumption, topical application delivers these compounds directly to hair and scalp.
The vitamin E in flaxseeds acts as an antioxidant. According to the National Institutes of Health, vitamin E supports scalp health, though more research is needed on topical applications specifically for hair care.
The process is straightforward. When you boil flaxseeds, the mucilage dissolves into the water. The liquid thickens and becomes stretchy, forming a natural gel that looks similar to egg whites. This gel-like consistency comes from the soluble fiber coating on the seeds.
This gel creates a light film around each hair strand without weighing it down. It smooths the cuticle and may provide several benefits:
- Moisture retention without heavy buildup
- Temporary frizz control in humid conditions
- Natural shine from smoothed cuticles
- Hold for curl definition in wavy and curly hair
- Gentle formula suitable for sensitive scalps
Unlike commercial gels containing high-alcohol formulations, flaxseed gel provides a flexible hold. Hair remains soft and touchable instead of stiff. The gel is also approved for the Curly Girl Method, a hair care approach that avoids harsh sulfates and silicones.
The zero-waste aspect adds practical value. No plastic bottles. No synthetic fragrances or preservatives. Just two simple ingredients that work.
Flaxseed Gel Recipes: Step by Step

Here is the list of ingredients for your magical hair gel:
1. Flaxseeds: Use whole flaxseeds, not ground ones. Both brown and golden flaxseeds work well. Brown seeds tend to produce slightly more gel. You can find them at grocery stores or health food shops.
2. Water: Filtered or distilled water works best. Tap water can contain minerals or chlorine that may reduce shelf life. If you only have tap water, it still works fine.
3. Optional Add-ins: You can customize your gel later. Common additions include aloe vera gel, essential oils, coconut oil, or vitamin E. Start with the basic recipe first.
Kitchen Tools You’ll Need
A small or medium pot for boiling. A fine-mesh strainer or cheesecloth to separate seeds from the gel. A glass jar or container with a tight-fitting lid for storage. A wooden or silicone spoon for stirring (metal spoons can get too hot).
Some people use old pantyhose or a tea strainer instead of cheesecloth. These work too, though a fine-mesh strainer proves easiest and less messy in practical testing.
Now that you have your ingredients and tools ready, let’s look at the tested recipes.
Here are three proven recipes based on multiple test batches. Start with the classic recipe, then adjust based on your results.
Classic Flaxseed Gel (Basic Ratio)
This is the standard flaxseed gel recipe that consistently produces reliable results. The ratio is simple: 1/4 cup flaxseeds to 2 cups water (1:8 ratio).
During testing, this ratio produced the most versatile gel consistency across different hair types.
Step 1: Pour 2 cups of water into a pot. Place it on the stove over medium-high heat.
Step 2: Bring the water to a rolling boil. Watch it carefully so it doesn’t boil over. The water should be actively bubbling before adding seeds.
Step 3: Add 1/4 cup flaxseeds to the boiling water. Stir immediately and constantly to prevent seeds from sticking to the bottom and burning.
Step 4: Reduce the heat to medium. Let the mixture simmer for 6 to 10 minutes. Continue stirring every 30 seconds to prevent sticking. The exact time depends on your stove’s heat level.
Step 5: Watch for texture changes. The water will start to foam and become noticeably thicker. You’ll see white froth forming on top, which indicates the mucilage is releasing properly.
Step 6: Test the consistency by lifting your spoon. The gel should drip slowly in a thick, stringy stream rather than running off like water. It should look similar to raw egg whites with a slight stretch. This is your signal that it’s ready.
Step 7: Remove from heat immediately once it reaches gel consistency. Overcooking makes the gel too thick to strain effectively. In testing, gel cooked beyond 12 minutes became difficult to work with.
Step 8: Strain immediately while hot. Place your fine-mesh strainer over a heat-safe bowl or jar. Pour the entire mixture through the strainer. Hot gel flows more easily than cooled gel.
Step 9: Use a spoon to press and stir the seeds in the strainer. Apply gentle pressure to extract more gel. The seeds should be mostly dry when you’re done. In testing, this technique increased gel yield by approximately 30%.
Step 10: Let the gel cool completely at room temperature before adding any optional ingredients. This takes about 30 to 45 minutes. Pour into a clean, sterilized glass jar.
This recipe makes approximately 1.5 to 2 cups of gel, depending on straining efficiency.
Storage: Refrigerate immediately in an airtight container. Use within 7 to 14 days for best quality.
Small-Batch Recipe for Testing
Don’t want to commit to a large amount? This smaller batch is perfect for first-time users or those with shorter hair who need less product.
Ingredients:
- 2 tablespoons whole flaxseeds
- 1.5 cups water
Instructions:
Follow the same steps as the classic recipe. The cooking time is slightly shorter, about 5 to 7 minutes. Watch it carefully and test the consistency with your spoon. The gel should still show that stringy, egg-white-like texture.
This yields approximately 1 cup of gel, which is enough for 5 to 7 applications on medium-length hair.
Storage: Use within 7 days for optimal freshness when stored in the refrigerator.
Custom Variations Backed by Research
Once you master the basic recipe, try these variations. Add these ingredients after straining, when the gel has cooled to room temperature. This prevents heat from degrading beneficial compounds.
1. Moisture Boost with Aloe Vera: Add 2 tablespoons of pure aloe vera gel to your finished flaxseed gel. Mix thoroughly until fully combined. Aloe vera contains polysaccharides that may help retain moisture, according to research published in the Indian Journal of Dermatology. This works well for dry or damaged hair.
2. Essential Oil Enhancement: Add 5 to 10 drops of essential oils. According to a 2015 study in Skinmed, rosemary oil showed promise for hair growth in patients with androgenetic alopecia. Lavender oil adds a calming scent and may have antimicrobial properties. Tea tree oil, studied for its antimicrobial effects, may benefit those with scalp concerns. However, essential oils can cause allergic reactions, so always patch test first.
3. Oil Addition for Dry Hair: Mix in 1/2 teaspoon of coconut oil or jojoba oil. Use a whisk or hand mixer to emulsify it fully into the gel. Research in the Journal of Cosmetic Science found that coconut oil can penetrate the hair shaft, potentially reducing protein loss. This adds moisture without excessive heaviness.
4. pH Balance for Scalp Health: Add 1 teaspoon of raw apple cider vinegar to the cooled gel. This helps balance pH levels on your scalp. The American Academy of Dermatology notes that pH balance matters for scalp health, though individual needs vary.
Start with small amounts of add-ins. You can always increase the quantity in your next batch based on your hair’s response.
With these recipes ready, let’s talk about proper application techniques for different hair types.
How to Use Flaxseed Gel for Hair

Application method significantly impacts results. Here’s how to use flaxseed gel based on hair type and styling goals.
1. For Curly Hair (Type 3A-4C)
Apply the gel to soaking-wet hair immediately after washing. This technique is central to the Curly Girl Method. Divide hair into 4 to 8 sections based on thickness and density. Use a quarter-sized amount per section.
Apply using the praying hands method: press palms together with hair between them, then slide down from roots to ends. This smooths the cuticle and distributes product evenly.
Gently scrunch upward to encourage curl formation. Let hair air-dry completely without touching it. Once fully dry, scrunch gently again to break the gel cast. This reveals soft, defined curls with natural bounce.
2. For Wavy Hair (Type 2A-2C)
Wavy hair typically needs less product than curly hair. Apply a dime-sized amount from mid-length to ends only. Scrunch gently to enhance your natural wave pattern without creating frizz or weighing hair down.
Avoid applying at the roots unless your hair is very thick. Too much product near the scalp can make wavy hair look flat or greasy.
3. For Straight Hair (Type 1A-1C)
Straight hair benefits from flaxseed gel primarily for shine and flyaway control. Use a pea-sized amount on damp hair after washing. Focus on the ends and any frizzy areas that need smoothing.
Smooth the gel down with your palms instead of scrunching. This keeps hair sleek and prevents unwanted texture or waves from forming.
4. For Twist-Outs and Protective Styles
Apply a generous amount of gel before twisting hair in the evening. The gel provides hold without stiffness. Let your twists dry completely before unraveling them the next morning.
This technique creates soft, defined texture that typically lasts 3 to 4 days with proper nighttime protection.
Important Application Tips:
- Always apply to wet or damp hair, never fully dry hair
- Start with less product than you think you need
- Use a silk or satin pillowcase to reduce friction and frizz overnight
- Cleanse hair with a gentle shampoo before reapplying gel to prevent buildup
Now, let’s look at how flaxseed gel works for face and skin care.
Flaxseed Gel for Face & Skin

Flaxseed gel works as a natural facial moisturizer and skin treatment. Here’s how to use it safely:
How to Use Flaxseed Gel on Skin:
- Always do a patch test on your inner arm first and wait 24 hours
- Apply a small amount to clean, damp skin
- Massage gently in upward circular motions
- Use morning or night as part of your routine
Flaxseed Gel Skin Care Variations:
- Rose Water Blend: Mix equal parts gel and rose water to soothe redness
- Aloe Vera Blend: Combine 2 parts gel with 1 part aloe for irritated skin
- Cool Packs: Freeze diluted gel for puffy eyes or swelling
Benefits for Skin:
- Provides lightweight hydration without clogging pores
- Helps calm irritated or red skin
- Absorbs quickly without greasiness
Remember that flaxseed gel is not a cure for serious skin conditions. Consult a dermatologist for persistent problems.
Now that you know how to use flaxseed gel for hair and face, let’s talk about storage and shelf life.
How Long Does Flaxseed Gel Last and How to Preserve It?
Flaxseed gel has a short shelf life because it contains no synthetic preservatives. This makes it safer for sensitive skin but requires careful storage.
According to food safety guidelines, homemade products with high water content should be refrigerated and used within a short timeframe to prevent bacterial growth.
Storage Timeline:
Without preservatives, store your gel in the refrigerator at 35-40°F (2-4°C) for 7 to 14 days maximum. Some users report their gel staying fresh for up to 3 weeks when essential oils with antimicrobial properties are added, though this varies.
Signs of Spoilage:
Fresh flaxseed gel smells nutty or has virtually no scent. Spoiled gel develops a sour, musty, or unpleasant odor. Visual signs include cloudiness, separation, or any visible mold growth (which may appear as fuzzy spots or discoloration). If you observe any of these signs, discard the gel immediately. Never use spoiled gel on your hair or skin.
Ways to Extend Shelf Life
Use glass storage containers: Store in airtight glass containers with tight-fitting lids. Glass is less porous than plastic and reduces bacterial contamination risk.
Add essential oils carefully: Add 5 to 10 drops of essential oils like lavender, tea tree, or rosemary after the gel cools. Research published in Letters in Applied Microbiology found that some essential oils have antimicrobial properties. However, essential oils can cause allergic reactions, so patch test first.
Add vitamin E oil: Mix in 1 to 2 teaspoons of vitamin E oil per batch. Vitamin E acts as an antioxidant and may help slow oxidation, according to the National Institutes of Health.
Use distilled water: Make gel with distilled water instead of tap water. This reduces minerals and potential contaminants that could promote bacterial growth.
Freeze for long-term storage: Pour gel into ice cube trays or small portions and freeze for up to 3 to 6 months. Thaw in the refrigerator overnight before use. Freezing effectively halts bacterial growth. Once thawed, use within 3 to 5 days.
Practice clean handling: Always use clean utensils when removing gel from the container. Never dip your fingers directly into the jar, as this introduces bacteria from your hands. Consider using a small spatula or pump bottle for dispensing.
Many people prefer making small batches that get used within one week. The recipe only takes 10 to 15 minutes anyway, making frequent fresh batches practical.
Now let’s address common problems you might encounter when making or using flaxseed gel.
Troubleshooting Common Flaxseed Gel Recipe Issues
Making flaxseed gel is simple, but you might run into a few problems. Here’s how to fix them quickly.
| Problem | Solution |
|---|---|
| Gel too watery | Boil the mixture a little longer next time. Add more flaxseeds or reduce the water amount in your next batch. |
| Gel too thick or slimy | Add a bit of hot water while stirring to thin it out. Use fewer flaxseeds or more water in your next batch. |
| Hard to strain | Strain while the gel is still hot, not after it cools. Use cheesecloth or a finer mesh strainer for easier separation. |
| White flakes in hair | Never apply gel to dry hair, only to wet hair. Use less product or scrunch out the crunch more gently. |
| Gel smells bad quickly | Always store in the refrigerator in a clean container. Add essential oils or vitamin E to extend freshness. |
| Seeds sticking to the pot | Stir constantly while boiling to prevent sticking. Rinse the pot immediately after straining; don’t let it sit. |
| Mold or cloudiness | Always use clean utensils, never touch gel with fingers. Make smaller batches that you’ll use within 1 to 2 weeks. |
Most problems are easy to fix with small adjustments. Don’t give up after your first batch if it doesn’t turn out perfect.
Now let’s wrap up everything you’ve learned about making and using flaxseed gel.
Conclusion
Making your own flaxseed gel is a game-changer for natural hair care and skincare.
This simple flaxseed gel recipe saves you money while giving you a chemical-free styling product that actually works.
With just flaxseeds and water, you can create a versatile gel that defines curls, controls frizz, adds shine, and even hydrates your skin.
Start with the classic recipe and customize it with oils or aloe vera to match your needs.
Store it properly in the refrigerator to keep it fresh for up to two weeks.
Whether you have curly, wavy, or straight hair, this DIY gel delivers professional results without the harsh ingredients found in store-bought products. Try it today and experience the difference.